Showing posts with label crafts. Show all posts

Wednesday, November 20, 2013

My Life As of Late

Because I've let myself get behind yet again, I will keep it short by catching up in picture form.

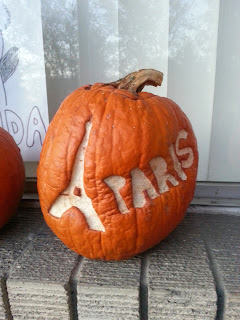
This was my pumpkin for Halloween this year. Didn't actually carve it, but I like how it turned out. Maybe one day I'll see the real thing.
If you didn't already know, I've got a huge thing for polka dots. I got this sweater at Forever 21. I'm a huge fan of their sweaters. It's one of my favorite clothing items in my possession.
My friend Jensen and Porter are becoming close friends. 
Amber and I decided to have an all nighter one Friday night and both had our first Monster Energy drink to help us stay awake. I lasted until 5 AM , which is pretty impressive since I usually go to bed before midnight for work and my internal clock is set to make me tired around 10.
Pumpkin Pie Ice Cream!! We made shakes and threw in some chocolate chips. We also added a few spoonfuls of eggnog  ice cream too. YUM!
I just had to put this here. It's too perfect. Love Emma Stone. Love Easy A.

Amber and I decided to chalk our hair on Saturday and I messed around some more on Sunday. It's a fun and non permanent way to add color to your hair. I really liked the look of the red in my hair.


Fast forward a few days...

I DYED MY HAIR!!!
I've always been against dying my hair until I go gray because I love my hair and it's to expensive to keep it up after you start. I'm too low maintenance for that and I'd rather spend my money elsewhere. After chalking my hair, I kept thinking about adding some color to my hair permanently. I only wanted to do the ends so I could cut it if I didn't like it without being bald and it  it was cheaper. I looked at pictures online and ws deciding between red and purple. Amber, my roommate, is a red head (and I somehow managed to convince her to do it too) and purple was one of the few colors that would work for her so I went for the obvious choice. I regret nothing. I was terrified to do it myself because like most girls, I'm pretty attached to my hair and I was sure I was going to manage to screw it up. When we were buying the dye, we had to admit to the employee at Sally's Beauty Supply that we were clueless. She told us what to use and then I went home and watched a few youtube videos and then went for it. Since my hair is dark, I had to bleach it first so the read would show better.


Then it was time to add the red. 

Took this at work the next day. Rockin' the red and the polka dots. 
i love it. I Love It. I LOVE IT. 

I got so many compliments and people were surprised I actually went through with it. I was surprised I went through with it. One worker even serenaded me with Alicia Keys' "Girl On Fire". It was great.

I think a lot of people have been getting the itch to do something different with their hair because Jensen wanted to shave his hair.
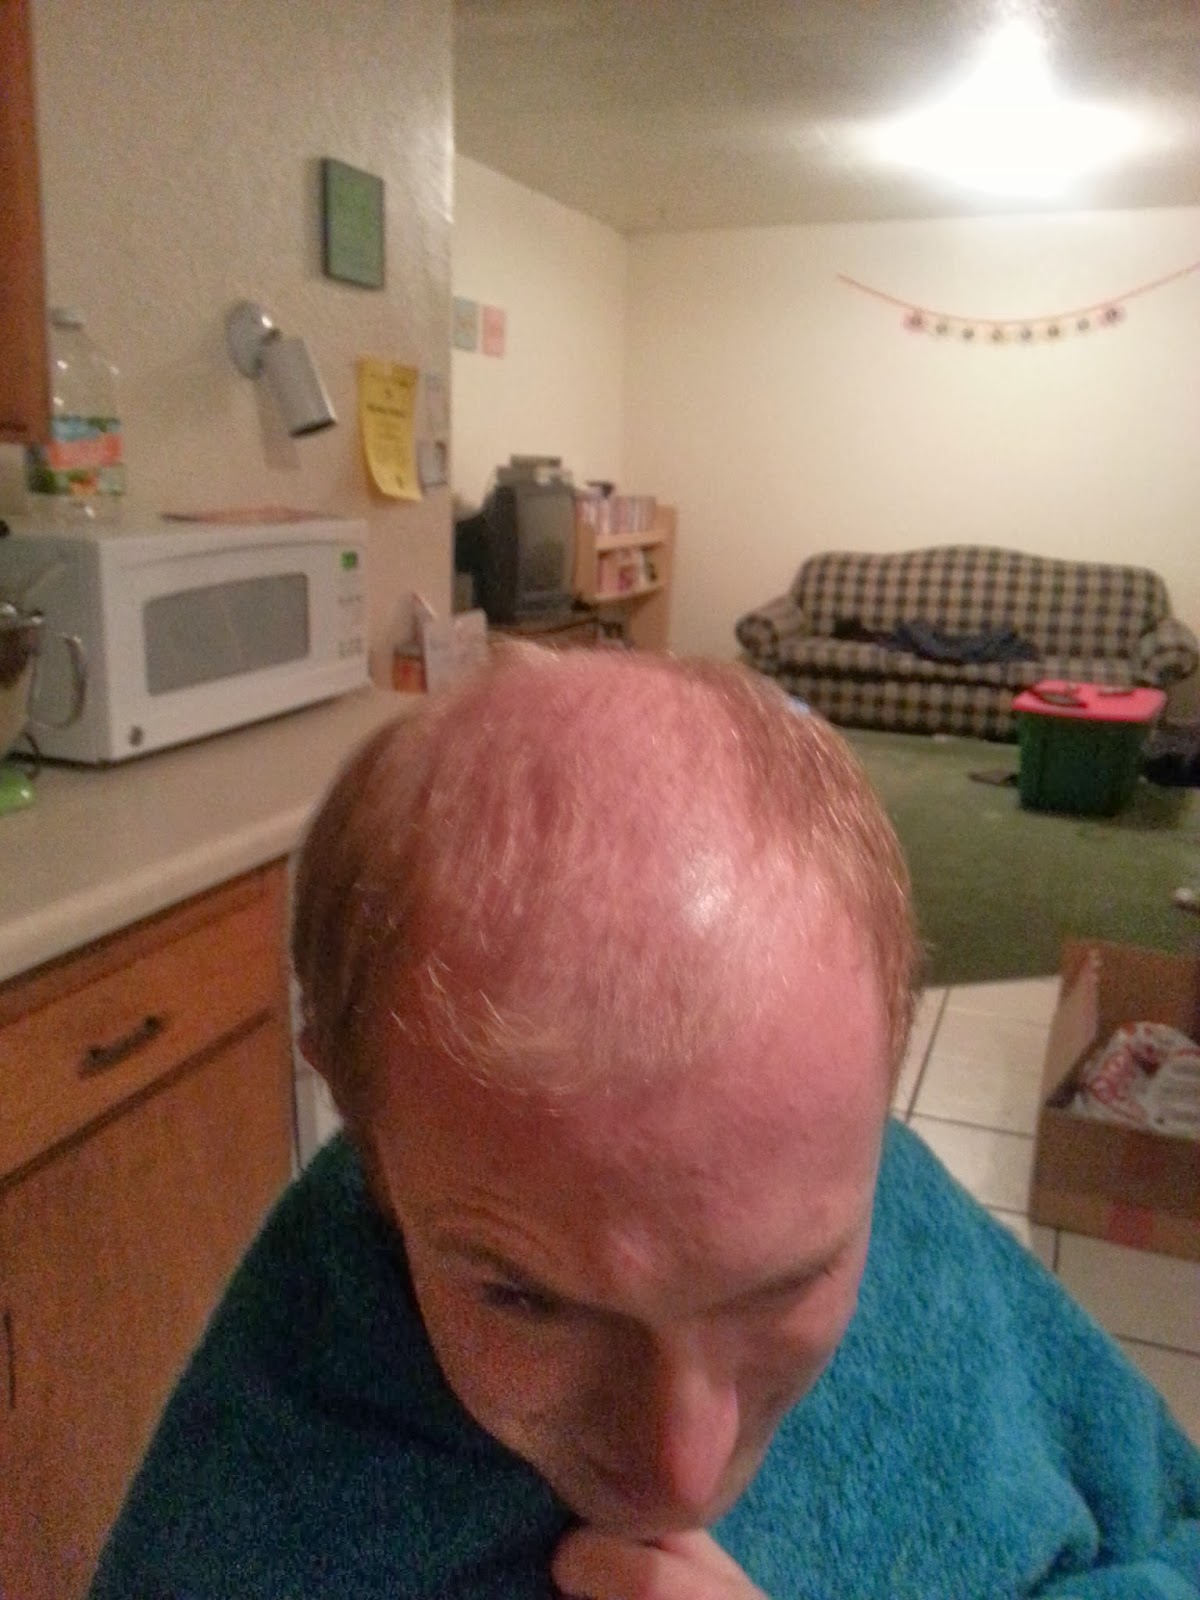
It's been said that the first cut is the deepest. In his case it was the hardest. Its the shortest his hair has been in a long time or maybe ever.
Finished. He doesn't look too pleased.
He likes it. I did pretty good if I do say so myself, although its not that hard to just shave a head. 
Lately I've been in a crafty mood. I made these using cheap canvas, scrapbook paper and thumbtacks. i put some cardboard in the back so the thumbtacks would stay better and not just be poking through. 
Live. Laugh. Love.
Not a fan of the way the L turned out on love but I didn't want to fix it.
I made this banner for Thanksgiving. I'm the process of making a different one, also for the upcoming holiday, but since I'm moving at a snail's pace it may have to make it's debut next year. Sad.
Isn't it pretty?
Well, I think that's about it. Of course other things have happened, but I don't have pictures documenting them and that's okay. I'm getting better at taking pictures because it is nice to have the memories captured, but it's also good to just live in the moment and not worry about collecting the moments on film (or in most cases these days on phones). Life is for living and that's what I'm doing.


Sunday, March 24, 2013

Crafting With Paint Chips

I have been itching to do something crafty for a while now and decided to do one that wouldn't cost me a whole lot to do because I'm trying to save money right now. What's better than free? Nothing. I got some inspiration from Pinterest and decided to use paint chips. Some might consider it stealing, and I'll admit I felt guilty taking some, but I saw on a craft blog a comment from someone that said they called a customer line for Behr and they think its great because it gets them publicity. I justify taking them because while I don't have the need for that paint right now, one day I will have a home that I get to paint whatever colors I want.

I have made two things using paint chips. The first is a Peeps banner for Easter and Spring. 

The second was to show my love for home, Good Ol' Oregon. This one was done like a mosaic. It was harder than I thought it was going to be. It was time consuming to cut the paint chips to the right shapes and sizes. I'm happy with how it turned out.


Sunday, August 14, 2011

Colorful Cupcake Decor

I made one of my cupcake crafts this weekend! I had a coupon for Jo-Ann's and they were having their founder's sale, so I was able to get everything I needed for a great price. 

Here is the example:

And here is mine:


My frame isn't as fancy, and that's okay because it was only $3 at Walmart. I also didn't use the pop dots to make them stand out because it really doesn't matter since they're in a frame (plus there wasn't room in the frame I used). I also didn't make marks where each cupcake was supposed to go because I'm not that patient. Although I tend become an OCD perfectionist when I do projects and crafts, it just seemed too time consuming and I was too excited to finish. I think I did a pretty good job by just eyeing it. And I've been slowly trying to teach myself that the little imperfections (that only I seem to be able to see) add character and make it better. Besides, I can't expect something handmade like this to be completely perfect. Let's face it, nothing in this world is.

In case you missed the post with the link to the tutorial, here it is again. 

Saturday, July 30, 2011

{Framed}

After that nasty last post, I figured I should write a pleasant one.

I found two framed cupcake related crafts that I'm going to do. I don't know when, but I will.  


Isn't it cute? You can find the instructions here.


I love etched glass. The look of it is so pretty and elegant. A Cricut was used to cut the letters out so this project will probably be done during Christmas break when I'm home and have access to one. Instructions for this project can be found here. This idea can be used to make other signs, like fresh cookies. You can make it say anything you want. That's one thing I love about crafts, you have so much freedom.

I'll be sure to post pictures of mine whenever I get around to doing them.

Tuesday, March 8, 2011

Decor For the Poor

I once again find myself enthralled by the creativity that people possess. I have found a few more projects that I would like to take on eventually. They are mostly things to spruce up my apartment. My roommates and I have decided that we want to make our place look more homey next year. Right now it's just blah. We're not allowed to hang things using nails so that kind of limits what we can do. Rylee and I were kind of thinking we'd ignore that rule because other people do and there's already some holes in our walls. Maybe now we won't have to be bad tenants that break the rules. All of these, with the exception of one, are pretty cheap. They are all easy, which is why I like them. And that they don't require sewing. My lack of sewing skills as well as the desire to have said skills greatly limits many of the DIY projects I can do. It kind of make me sad, but not enough to drive me to learn. On the bright side, I won't have to spend lots of money on fabric making tons of cute handbags (these are really the only DIY sewing projects that really interest me).

Here's the first one. They are starched fabric frames that you stick to the wall using an iron. They peel right off without damaging that paint. I never knew you could iron something to the wall. I probably won't end up doing this one because fabric is pricey and I don't know anyone here that would have nice scraps. I will probably end up using this in in my future home. I think it would be cute in a kid's room. Whatya think?

You can find the instructions here.

I love the really modern look to this next one. These patterned wall squares are really cheap and easy to make. I'm pretty positive these are going up on our wall. You can also make them in other shapes, but of the shapes I can think of, squares seem like the best choice. You kind find the instructions for this geometric wall art here.

Aren't they cool?

The third one is the cheapest of them all. I think it would look great on one of our side tables. It's branches with paper berries. You just go outside and find some small branches and use a circle scrapbooking punch (or trace a coin and cut if you think you can do it well) to cut out paper circles to glue to the branches. I'm going to have better paper berries though. I'm thinking red, orange and yellow. Or maybe blue, purple and yellow. I don't like how they threw the blue in there. I mean, I understand about wanting colors to pop, but I'm not sure about this one.

Instructions for this berry easy decor can be found here.
{Please excuse the cheesiness.}

The inspiration for this came from the fabric of something at Ikea. I've seen this design multiple places. I really like it.


This is the only non-apartment decor one that I found. They are individual paper cupcake stands. If I ever had a little party or dinner I could use them as place cards or just to decorate a dessert table. You can use cardboard or colored cardstock. They are so simple and cheap to make. Find the instructions here.


Anyway, just thought I'd share some things that I've found and that I'm excited to eventually try. If anyone tries these, please send me a picture and let me know how it turns out :)

Friday, February 25, 2011

Gettin' My Craft On

I love blog stalking all the really crafty and creative people that are out there. I wish I could be as half as creative as they are. I mean, I'm creative to certain degree, but these people take it to another level. They live and breathe creativity. So, last night I was looking at cupcake and baking blogs. It reminded me of something that I've wanted since I acquired my little cupcake obsession...a cupcake stand! I've wanted a cute way to display my cupcakes besides just putting them on a plate, platter or cooling rack. I make cupcakes enough that I figured it would be a good investment. Well, there are some crafty ladies that came up with a few different DIY (do-it-yourself) cupcake stands.

This one is made from terracotta pots and saucers (and a few other things). It costs a little less than $20 to make a set of two. Instructions can be found here.


The second one I found is made from cake boards and cake dummies.


I decided to make this one. Not only is it cheaper (if you don't count shipping...there is nowhere nearby to buy the parts so I looked online), but I like how the tiers are bigger and it can hold more cupcakes. Plus it's lighter and not as breakable. Paying for shipping sucks, but I figured it's totally worth it. Instructions for this one can be found here.

My stuff should come next week and then all that's left is to hit up Jo-Ann's for some ribbon, cute paper (too bad I'm not at home), and glue. I'll be sure to post pictures of my finished product. I'm so excited for this, you have no idea! Or maybe you do.